Media Creation Tool CLI
05 June 2025
Media Creation Tool Command Line Interface
This post will introduce a Command-line tool that I developed to fully automate the creation of Windows installation media in form of a usb-drive. But I didnt stopped there because you could get that using the official Windows Media Creation tool from Microsoft…I wanted my tool to have even more features that simplify things even more.
So let me introduce you to mctcli - which stands for:
M edia
C reation
T ool
C ommand
L ine
I nterface
and is a simple to use powershell script which creates Windows installation medias with even more than just Windows 11.
What are the key features?
- Download
ARM64orX64versions of Windows 11 - Download the latest Windows 11 version. Currently 24H2.
- Download the selected language of Windows 11
- Define which version of Windows 11 you want to use:
- Home
- Pro
- Pro N
- Enterprise
- Enterprise N
- Education
- Education N
- Define on which drive letter you want to create the media creation tool
What other features does it support?
- Autounattend deployment
- OEM driver integration
- “Some” Autopilot troubleshooting scripts included
Where do I get the tool?`
This question is simple, check out my Github Repo which hosts the script files.
It is free to use and I am still working on adding other features and optimize it.
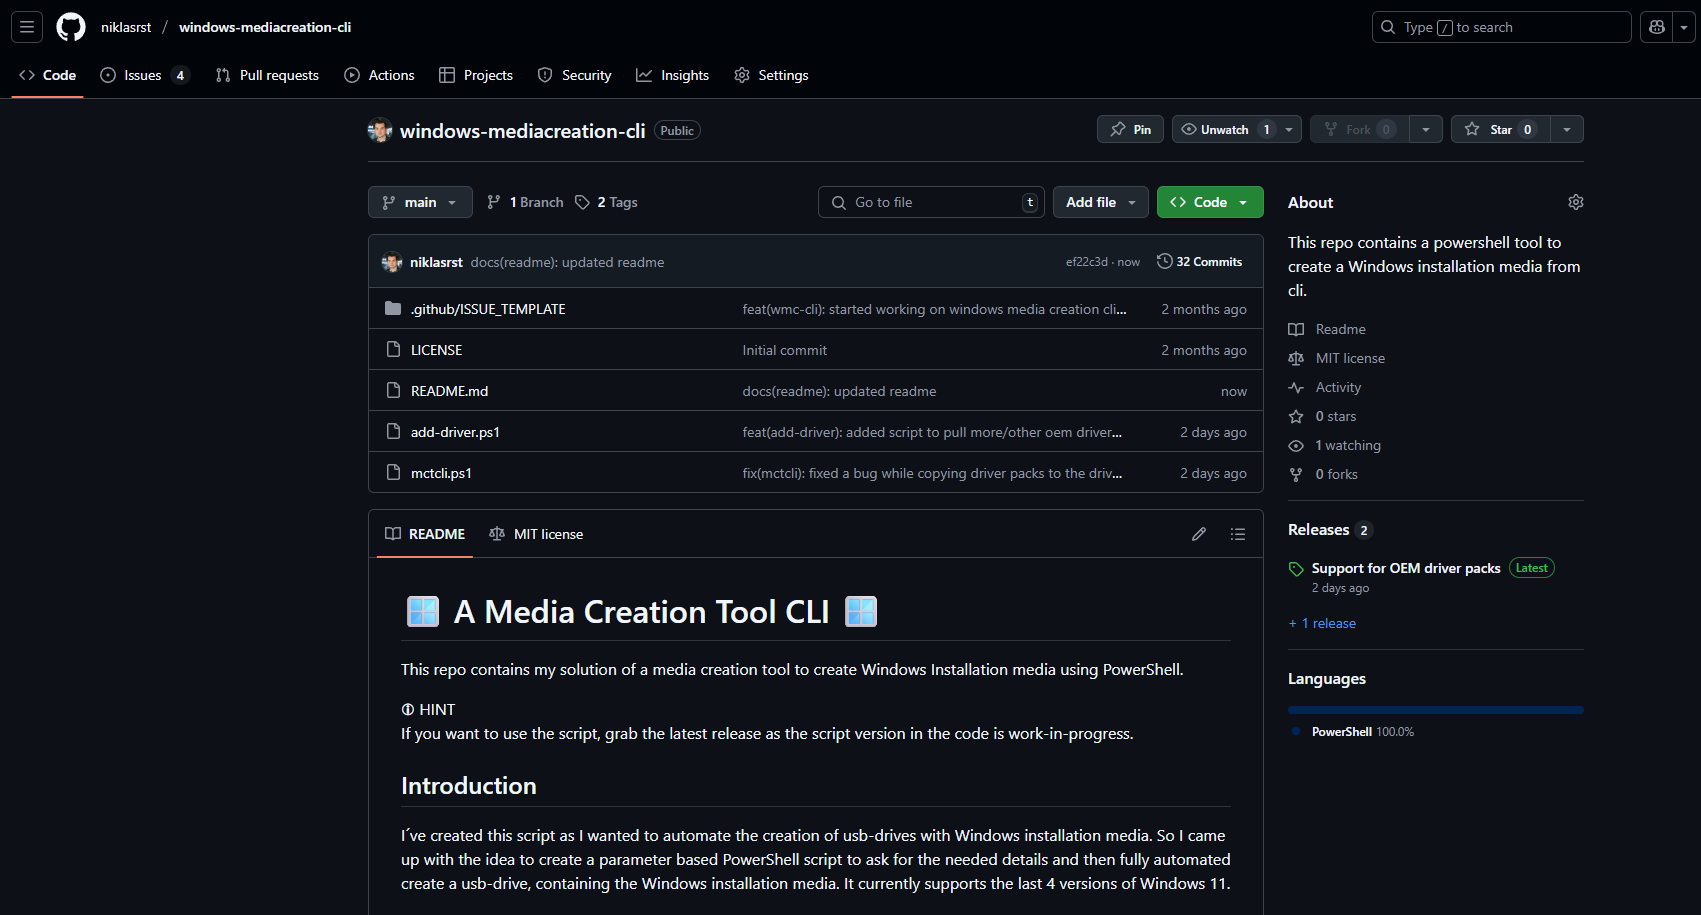
[!NOTE] Check out the Readme file in the repo as this always will hold the latest documentation on how to use the script and its parameters.
Media Creation Tool CLI
How to run the script?
Download the mctcli.ps1 script from my Github Repo. Then start a elevated PowerShell console and run the following command from the folder where you downloaded the script into.
This sample will pull Windows 11 with:
- Architecture:
amd64 - Version:
24H2 - Language:
en-us - Region:
en-us(this parameter is only needed if you need different regional settings that from the base language) - Edition:
Pro - UsbDriveLetter
"E:"(this parameter defines the letter of the usb-drive where you want to apply the install media onto)
Add OEM drivers
If you want to include oem drivers you need the -DriverManufacturer and -DriverModel parameter.
Dell, Lenovo and HP are the supported manufacturers for oem drivers in this script. The Manufacturers are hard coded into the parameters so you can “tap” trough the tree supported manufacturers. For models you could use for example “Latitude 5440” or “ThinkPad X390” or “Z6 G5” to name one model per manufacturer :)
Dont forget to use the -DriverInjectionType switch with a value of DISM or AUTOUNATTEND to control how to inject the drivers…explained later in this post.
So a sample call of the script could look like this:
.\mctcli.ps1 -Architecture amd64 -Build 24H2 -LanguageCode "en-us" -RegionCode "en-us" -Edition Pro -UsbDriveLetter "E:" -DriverManufacturer Dell -DriverModel "Latitude 5440" -DriverInjectionType DISM -Verbose
How to use the parameters?
As the script has some parameters I tought it would be nice to have them described.
So the script has a Parameter based help section in the top, which I also have in the Readme at the repo.
I added a description for each parameter to tell you what this parameter does, what values are supported and if applicable what its default value ist:
-Architecture
    The architecture of Windows to download. Valid values are amd64 or arm64.
    The default is x64.

-Build
    The build number of Windows to download. Valid values are "21H2", "22H2", "23H2", "24H2".
    The default is the 24H2 build.

-LanguageCode
    The language code of Windows to download. Valid values for example are en-us, de-de, fr-fr, es-es, it-it.
    The default is en-us.

-RegionCode
    The regional code of Windows to download. Valid values for example are en-us, de-de, fr-fr, es-es, it-it.
    The default is en-us and will be matched to LanuageCode. if not set.

-Edition
    The edition of Windows to download. Valid values are "Home", "Pro", "Pro N", "Enterprise", "Enterprise N", "Education", "Education N"
    The default is Pro.

-UsbDriveLetter
    The drive letter of the USB drive to create the bootable media.
    For example "E:".

-DriverManufacturer
    The manufacturer of the drivers to download. Valid values are "Dell", "Lenovo", "HP".
    The default is not set.

-DriverModel
    The model of the drivers to download. This is optional and will be used to filter the drivers from the manufacturer.
    For example (Dell) "Latitude-5440" or (Lenovo) "ThinkPad X390" or (HP) "Z6 G5".
    The default is not set.

.PARAMETER -DriverInjectionType
    The type of driver injection to use. Valid values are "AUTOUNATTEND" or "DISM".
    The default is not set.

-Verbose
    Enable verbose output. I recommend using this parameter, as it exactly shows you what the script does and where it currently is.
What happens when the script runs?
This section will describe what the script does, how it works and why I build it like it is.
Step-by-Step description
- Create temp directory
- The script needs a directory to download all the files into, to work with them. Therefore it creates the folder
mctcli(and some subfolders that only exists during runtime) at%LOCALAPPDATA%\temp.
- The script needs a directory to download all the files into, to work with them. Therefore it creates the folder
- Download ESD
- Microsoft provides a
XMLManifest file, (Check out this MCT Catalogs API to query for the latest Manifest urls) containing all the download liks for all Windows 11 versions. The script downloads this file and uses regex to search for the specific version of Windows that you requested using the parameters. Once it found the version, it will download asEdition-LanguageCode-Build-Architecture.esdinto themctclifolder. - If you execute the script for the second time and the version of Windows 11 that you request is already downloaded it will use it and dont download it again…so you dont have to wait again for the download.
- The manifest file is hosted here for Windows 11 if you would need it for Windows 10 they also have that available, but because of the upcomming end-of-support I decided to only offer Windows 11 with this tool. FYI they serve the manifest packed in a
.cabfile which you need to extract when you want to work with it.
- Microsoft provides a
- Extract
setup,bootandinstall-wim files- To create the usb-drive we need to extract the
wimfiles from the esd:- setup: This one holds the files for the bootable media. Which will be copied to the root folder of the NTFS partition.
- boot: This holds the preboot environment of the windows setup which is needed to apply the install.wim.
- install: This holds the Windows version.
- To create the usb-drive we need to extract the
- Format usb-drive into 2 partitions
- I had the goal to use
NTFSas the format to be able to hold larger.wimfiles and driverpacks - this wouldnt be possible withFAT32but it wasnt possible to boot fromNTFS. So i figured out that you can use two partitions with a custom bootloader. Thats why the script creates two partitions and as you will see in step 7 and loads the Rufus Bootloader onto the first partition. This then looks on the second partition which isNTFSfor the Windows Setup.
- I had the goal to use
- Copy contents from
setup.wimto the root of the second usb-drive-partition- Now we need to temporary mount the
setup.wimas it holds all the files and structure of a Windows installation media, while mounted we copy everything on theNTFSpartition and then dismount thesetup.wim.
- Now we need to temporary mount the
- Copy
boot.wimandinstall.wimto the\sources\folder on the usb-drive- This part is easy, we simply copy
boot.wimandinstall.wimto the\sources\folder on the usb-drive which will be used to boot the PE and apply theinstall.wimto the newC:\drive which will hold the operating system.
- This part is easy, we simply copy
- Download the Rufus Bootloader to the first partition on the usb-drive.
- From my research I found the Rufus bootloader to work like I needed it. You need to copy the efi files to the
FAT32partition and it then, while booting, looks to theNTFSpartition for the boot files.
- From my research I found the Rufus bootloader to work like I needed it. You need to copy the efi files to the
- Download drivers
- This part was really interesting for me to learn. Similar to the Manifest file from Microsoft to query for Windows download urls, Dell/Lenovo and HP have manifests to query for enterprise driver packs. So I implemented the
DriverManufacturerandDriverModelparameters to have a search string which the script then builds to query the oem driver manifests to get download urls, download the driverpacks, silently extract them and copy them on the usb-drive in the\drivers\folder. In step 10 we will configure how this then will be used from the Windows setup. - You can find the manifest files here:
- DELL: driverpackcatalog (.cab file that needs to be extracted to work with the xml)
- LENOVO: driverpackcatalog
- HP: driverpackcatalog (.cab file that needs to be extracted to work with the xml)
- Because of an
Issuestarting with Windows 11 24H2 I´ve implemented a switch to control how you inject drivers. If Microsoft fixes this with the next version of Windows I am happy to use it from theautounattend.xmlanddrivers-folder again - but until then we have to use DISM…which you can control using a switch parameter in my script or by using the dism-driver-injection branch
- This part was really interesting for me to learn. Similar to the Manifest file from Microsoft to query for Windows download urls, Dell/Lenovo and HP have manifests to query for enterprise driver packs. So I implemented the
- Add Autopilot Troubleshooting scripts
- I often use the
Get-AutopilotDiagnosticsCommunity.ps1,Get-WindowsAutopilotInfoCommunity.ps1andGet-IntuneManagementExtensionDiagnostics.ps1scripts from @Andrew Taylor and @Petri Paavola so I asked them to use their scripts in my tool and they agreed. Check those tools out they are really usefull for Intune Admins. Maybe I will add more scripts in the future…
- I often use the
- Add autounattend file for the specific version of Windows 11
- Since I learned about the
autounattend.xmlyears ago, I always created on for Windows Installation media. So of course we needed that here. What it (simply said) does is to automate the Windows setup. You can pre-configure disk-layout, language and so on and also it supports further automations like to define a folder on the Installation media which holds driverpacks which will be installed from the Windows setup. - There are two ways of integrating drivers to a Windows setup:
- a: inject drivers using dism to the install.wim (less dynamic and more work to do)
- b: use autounattend with a folder of drivers (super dynamic and easy to configure AND you can easily add more drivers later on)
- Since I learned about the
- Cleanup
- To cleanup the files we used and free up disk space on your client I integrated a cleanup which removes everything except the
.esdfile. I keep the esd file if we want to create another boot stick. Im thinking about adding a parameter (switch) to configure to keep or delete it if you want to control that. Maybe give me feedback in the comments on LinkedIn?
- To cleanup the files we used and free up disk space on your client I integrated a cleanup which removes everything except the
Verbose output
I would definitely recommend to use the -Verbose parameter as this shows you everything and exactly what the script does. So a output using the -Verbose parameter would look like this…telling you about every step (I wanted to have a very detailed log when using -Verbose so its easy to follow the script or if needed troubleshoot it):
VERBOSE: Created temporary directory C:\Users\NRAST\AppData\Local\Temp\mctcli\driverpack...
VERBOSE: Created temporary directory C:\Users\NRAST\AppData\Local\Temp\mctcli\setupwim...
VERBOSE: Created temporary directory C:\Users\NRAST\AppData\Local\Temp\mctcli\bootwim...
VERBOSE: Created temporary directory C:\Users\NRAST\AppData\Local\Temp\mctcli\installwim...
VERBOSE: Parameters
VERBOSE: Architecture: amd64
VERBOSE: Operating System Version Support: Windows 11 (Win11 / W11)
VERBOSE: Build: 24H2
VERBOSE: LanguageCode: en-us
VERBOSE: RegionCode: en-us
VERBOSE: Edition: Pro
VERBOSE: UsbDriveLetter: E:
VERBOSE: DriverManufacturer: Dell
VERBOSE: DriverModel: Latitude 5440
VERBOSE: Working Directory: C:\Users\NRAST\AppData\Local\Temp\mctcli
VERBOSE: ------------------------------------------------------
VERBOSE: Starting Windows Media Creation CLI at 12:43:03
VERBOSE: Pulling Pro from CLIENTBUSINESS_VOL...
VERBOSE: Build version converted to 26100...
VERBOSE: Architecture converted to x64...
VERBOSE: Downloading Manifest from https://go.microsoft.com/fwlink/?LinkId=2156292 to C:\Users\NRAST\AppData\Local\Temp\mctcli...
VERBOSE: Requested HTTP/1.1 GET with 0-byte payload
VERBOSE: Received HTTP/1.1 29251-byte response of content type application/octet-stream
VERBOSE: File Name: manifest.cab
VERBOSE: Extracting Manifest to C:\Users\NRAST\AppData\Local\Temp\mctcli\manifest_products.xml...
VERBOSE: Removing temporary file C:\Users\NRAST\AppData\Local\Temp\mctcli\manifest.cab...
VERBOSE: Parsing XML file C:\Users\NRAST\AppData\Local\Temp\mctcli\manifest_products.xml...
VERBOSE: Found ESD URL: http://dl.delivery.mp.microsoft.com/filestreamingservice/files/fc053c7c-7fca-4c3c-bde5-e1c49fa6189c/26100.2033.241004-2336.ge_release_svc_refresh_CLIENTBUSINESS_VOL_x64FRE_de-de.esd
VERBOSE: Downloading ESD file from http://dl.delivery.mp.microsoft.com/filestreamingservice/files/fc053c7c-7fca-4c3c-bde5-e1c49fa6189c/26100.2033.241004-2336.ge_release_svc_refresh_CLIENTBUSINESS_VOL_x64FRE_de-de.esd to C:\Users\NRAST\AppData\Local\Temp\mctcli...
VERBOSE: Requested HTTP/1.1 GET with 0-byte payload
VERBOSE: Received HTTP/1.1 4086371836-byte response of content type application/octet-stream
VERBOSE: File Name: Pro-en-us-24H2-amd64.esd
VERBOSE: Extracting setup from ESD to WIM format...
VERBOSE: Found setup.wim in index: 1. Exporting the image to WIM format...
VERBOSE: Extracting boot from ESD to WIM format...
VERBOSE: Found boot.wim in index: 3. Exporting the image to WIM format...
VERBOSE: Extracting install from ESD to WIM format...
VERBOSE: Found install.wim for Pro in index: 8. Exporting the image to WIM format...
VERBOSE: Mounting setup.wim file...
VERBOSE: Mounting install.wim file...
VERBOSE: Formatting USB drive E:...

DriveLetter FriendlyName FileSystemType DriveType HealthStatus OperationalStatus SizeRemaining     Size
----------- ------------ -------------- --------- ------------ ----------------- -------------     ----
D           BOOT         FAT32          Removable Healthy      OK                   1019.99 MB  1020 MB
E           windowsmedia NTFS           Removable Healthy      OK                     113.5 GB 113.6 GB

VERBOSE: USB drive E: is corretly formatted as NTFS.
VERBOSE: Copying Windows Setup files to USB drive E:...
VERBOSE: Unmount Setup WIM...
VERBOSE: Copying Windows boot.wim to USB drive E:...
VERBOSE: Copying Windows install.wim to USB drive E:...
VERBOSE: Copying EFI Files to MSFT_Partition (ObjectId = "{1}\\COMPUTERNAME\root/Microsoft/Win...).DriveLetter...
VERBOSE: Requested HTTP/1.1 GET with 0-byte payload
VERBOSE: Received HTTP/1.1 28672-byte response of content type application/octet-stream
VERBOSE: File Name: bootaa64.efi
VERBOSE: Requested HTTP/1.1 GET with 0-byte payload
VERBOSE: Received HTTP/1.1 17632-byte response of content type application/octet-stream
VERBOSE: File Name: bootarm.efi
VERBOSE: Requested HTTP/1.1 GET with 0-byte payload
VERBOSE: Received HTTP/1.1 19456-byte response of content type application/octet-stream
VERBOSE: File Name: bootia32.efi
VERBOSE: Requested HTTP/1.1 GET with 0-byte payload
VERBOSE: Received HTTP/1.1 20736-byte response of content type application/octet-stream
VERBOSE: File Name: bootx64.efi
VERBOSE: Requested HTTP/1.1 GET with 0-byte payload
VERBOSE: Received HTTP/1.1 188416-byte response of content type application/octet-stream
VERBOSE: File Name: ntfs_aa64.efi
VERBOSE: Requested HTTP/1.1 GET with 0-byte payload
VERBOSE: Received HTTP/1.1 147872-byte response of content type application/octet-stream
VERBOSE: File Name: ntfs_arm.efi
VERBOSE: Requested HTTP/1.1 GET with 0-byte payload
VERBOSE: Received HTTP/1.1 180544-byte response of content type application/octet-stream
VERBOSE: File Name: ntfs_ia32.efi
VERBOSE: Requested HTTP/1.1 GET with 0-byte payload
VERBOSE: Received HTTP/1.1 175040-byte response of content type application/octet-stream
VERBOSE: File Name: ntfs_x64.efi
VERBOSE: Adding driver directory...
VERBOSE: Searching Dell drivers for Latitude 5440 ...
VERBOSE: Replacing spaces in DriverModel with dashes...
VERBOSE: Requested HTTP/1.1 GET with 0-byte payload
VERBOSE: Received HTTP/1.1 319329-byte response of content type application/vnd.ms-cab-compressed
VERBOSE: File Name: delldrivercatalog.cab
VERBOSE: Found Dell driver URL for Latitude-5440 FOLDER12425806M/1/Latitude-5440-X5JF4_Win11_1.0_A11.exe
VERBOSE: Requested HTTP/1.1 GET with 0-byte payload
VERBOSE: Received HTTP/1.1 2721910904-byte response of content type application/octet-stream
VERBOSE: File Name: Latitude-5440-X5JF4_Win11_1.0_A11.exe
VERBOSE: Extracting Dell driver Latitude-5440-X5JF4_Win11_1.0_A11.exe to C:\Users\NRAST\AppData\Local\Temp\mctcli\driverpack ...
VERBOSE: Copying Dell driver to E:\drivers\Dell-Latitude-5440...
VERBOSE: Cloning Troubleshooting tools...
VERBOSE: Requested HTTP/1.1 GET with 0-byte payload
VERBOSE: Received HTTP/1.1 response of content type text/plain of unknown size
VERBOSE: File Name: Get-AutopilotDiagnosticsCommunity.ps1
VERBOSE: Requested HTTP/1.1 GET with 0-byte payload
VERBOSE: Received HTTP/1.1 response of content type text/plain of unknown size
VERBOSE: File Name: Get-WindowsAutopilotInfoCommunity.ps1
VERBOSE: Requested HTTP/1.1 GET with 0-byte payload
VERBOSE: Received HTTP/1.1 response of content type text/plain of unknown size
VERBOSE: File Name: Get-IntuneManagementExtensionDiagnostics.ps1
VERBOSE: Creating autounattend.xml file...
VERBOSE: Using SetupUILanguage: en-us, InputLocale: 0409:00000409, SystemLocale: en-us, UILanguage: en-us, UserLocale: en-us, OSImage: Pro...
VERBOSE: Cleaning up temporary files
Finished Windows Media Creation CLI in: 00:14:05
The last line also tells you how long it took (which of course depends on your Internet speed, admin-device and usb-sticks performance) to download everything and create the usb-drive ;)
Add Drivers to a Installation Media CLI
Maybe you had it in mind yet, when working in an IT department you often need to handle multiple devices and models. So Ive added a small script, called add-driver.ps1 to the project which only has the part for downloading, exctracting and adding drivers to the usb-drive. This way you can easily add more driverpacks afterwards or if you need other device models you can change it without needing to create the whole usb-stick from scratch.
You also find that script in my Github repo with the name add-driver.ps1. Execute it like this, it also supports Dell, Lenovo and HP like the first script:
.\add-driver.ps1 -Architecture amd64 -UsbDriveLetter "E:" -DriverManufacturer Dell -DriverModel "Latitude-7450" -DriverInjectionType DISM
Because of an Issue starting with Windows 11 24H2 I´ve implemented a switch to control how you inject drivers.
- AUTOUNATTEND: Creates a folder
driverswhere the oem driverpack is stored and applied troughautounattend.xml-> this doesnt work with 24H2 because Microsoft changed something in the setup. - DISM: Uses dism to inject the oem driverpack right in the
install.wim.
How does the final product looks?
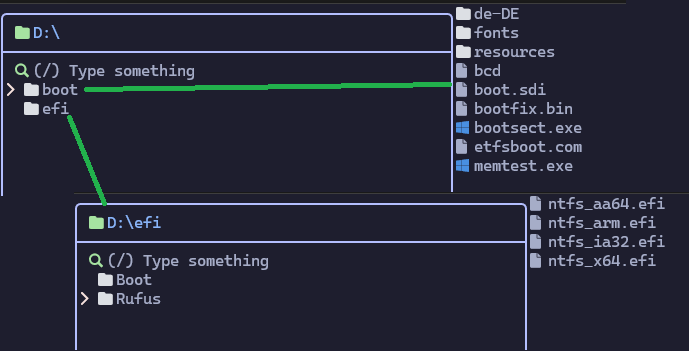
Bootloader structure
This is what a typical structure for a boot-stick bootloader looks, here using the Rufus bootloader. For this example it was the partition which got the driveletter “D:”.
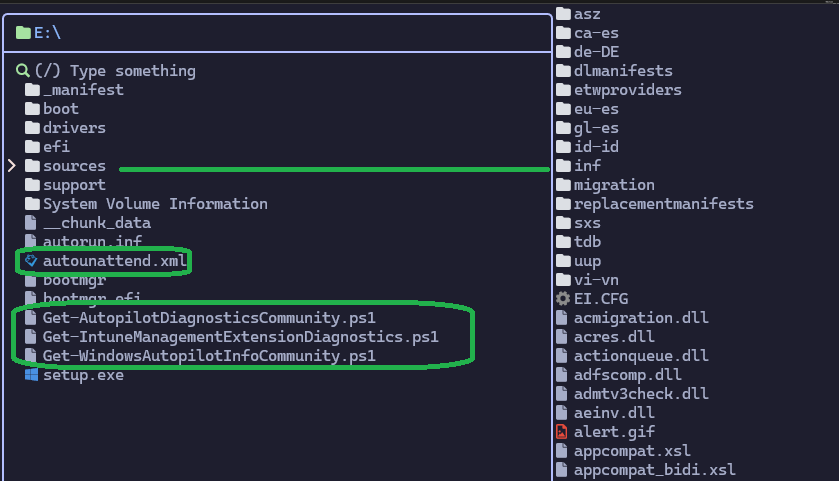
Setup media structure
As you can see, the usb-stick has the windows setup files, within the folder \sources\ you can find boot.wim and install.wim. For this example it was the partition which got the driveletter “E:”. … also our custom autounattend.xml as well as the “Autopilot Troubleshooting” scripts are in the root path of the usb-drive - you can use them with the WIN + F10 trick in OOBE:
Drivers structure
And the oem driverpack is here as well, in this example for a Dell Latitude 7450:
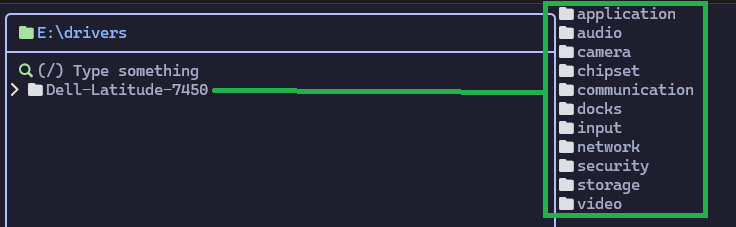 This of course only applies when using
 -DriverInjectionType AUTOUNATTEND, as DISM would inject the drivers in the install.wim under /sources/ ;)
Use the boot-stick
Once you have created your bootstick, simply plug it into a device that needs to be reinstalled with a fresh copy of Windows 11 and boot the device from this usb-stick. The key for changing the boot device depends on your device, often times its F10, F11, F12 or DEL…maybe check for your sepecific device model.
Conclusion
For me this project was a very interessting learning and it will help me with “bare metal” deployment or reinstalling broken devices from different hardware model. It was fun to get deeper insight on how windows setup media tools work and where they get content from. Also it was quiet funny how “easy” I could query Dell, Lenovo and HP for enterprise driverpacks, download them and silenty extract those in a Windows setup media attached with a autounattend.xml for a fully automated installation where all you need to do is to boot from the usb-stick. This script will help me at my day-to-day tasks and I hope it could help someone else - thats why I published it on Github and wrote this post to fully explain how it works.
If you have feedback, or other ideas that could make this solution even better feel free to add a Comment on LinkedIn or open a Feature Request / Idea Issue on Github - I will have a look into them and think about ideas - or if you want, code it yourself and create a PR ;)
Made with ❤️ by Niklas Rast