A Guide to Setting Up Windows Autopilot with Microsoft Intune for a Zero-Touch Experience
31 December 2023
How to configure Windows Autopilot for Zero-Touch deployments?
As organizations increasingly embrace remote work and digital transformation, the need for efficient and seamless device provisioning has become paramount. Windows Autopilot, in combination with Microsoft Intune, offers a powerful solution for achieving a zero-touch deployment experience. In this blog post, we will delve into what Autopilot is, the steps to enable and set up the service, the benefits it brings, and a comparison with pre-provisioning mode.
What is Windows Autopilot?
Windows Autopilot is a modern deployment technology introduced by Microsoft to streamline the process of setting up Windows devices for end-users. With Autopilot, administrators can pre-configure devices, making them ready to use right out of the box. It simplifies and automates the traditional setup processes by allowing devices to join Azure Active Directory (AAD) and enroll in Microsoft Intune, all without the need for IT intervention.
How does Windows Autopilot with Azure AD join works?
During the Windows Autopilot phase there are some things in the background. Lets see what those are and what they do.
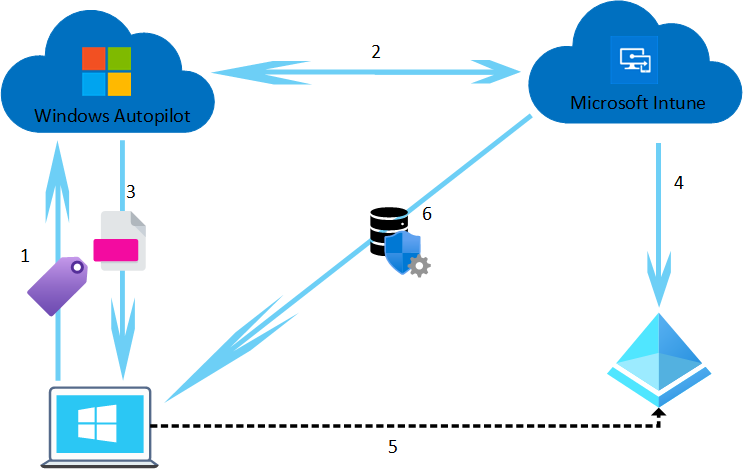
- Device contacts the Windows Autopilot during the OOBE and asks if it knows the devices hardware hash.
- Windows Autopilot detects the hardware hash in its database and connects to the Microsoft Intune instance of the customer from which the hardware hash has been uploaded and assigned to its organization. Intune sends the Autopilot profile to the Autopilot service.
- The Autopilot service forwards the Autopilot profile which will be downloaded and applied from the client.
- Intune registers the device in the customers Azure AD.
- The client sign-in to the customers Azure AD.
- After successfully authenticated, Microsoft Intune sends configuration profiles, deployed apps and more to the client. The client installs those assignments and finishes the OOBE.
After this process, the client is enrolled to the customers Microsoft Intune instance and ready to be used by an user.
Enabling and Setting Up Windows Autopilot
To enable and set up Windows Autopilot, follow these steps:
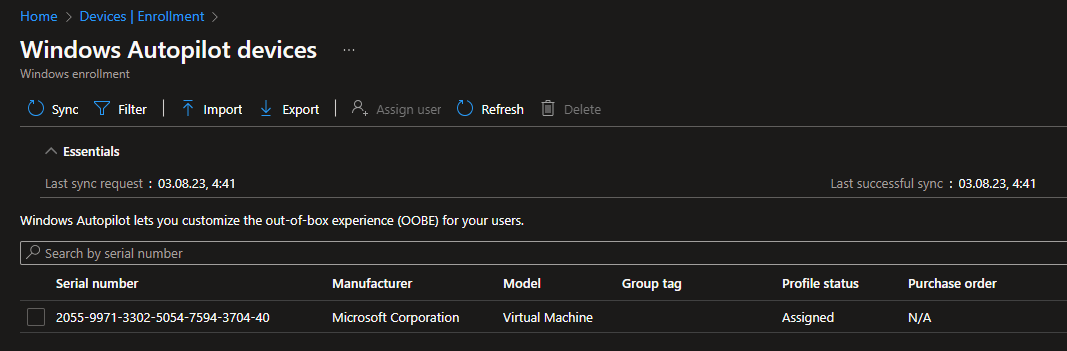
- Prepare Hardware: Ensure the devices you want to enroll in Autopilot are purchased from an OEM supporting Autopilot. Typically, new devices come with a hardware-based Autopilot profile. When you are going to use existing devices from you Inventory you need to extract the hardware hash manually, if you need help on how to extract the hardware hash manually you can read my other post HERE. You can check if devices are onboarded to the autopilot service and assigned to your organization by navigating to https://endpoint.microsoft.com and switching to Devices -> Enrollment -> Windows and here click on Devices under Windows Autopilot:
- Configure Azure AD: Make sure your organization has Azure Active Directory Premium licenses or an Enterprise Mobility + Security (EMS) license to access Autopilot capabilities.

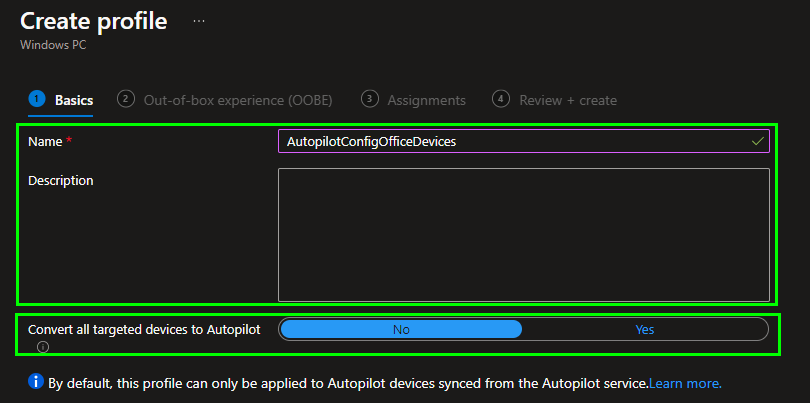
- Create Autopilot Profiles: Create Autopilot deployment profiles using https://endpoint.microsoft.com and switching to Devices -> Enrollment -> Windows and here click on Deployment profiles under Windows Autopilot. The profile defines settings and configurations for the devices during the deployment process. Start by Clicking on „+ Create profile“ in the top menu and select „Windows PC“.
Define a name, optionally a description and if you want that scoped devices will be migrated to Autopilot:
On the next page we will need to define the settings for the enrollment.
I will guide you through all settings, so that you can define your Autopilot profile:
First of all you need to decide if you want „User-Driven“ enrollments where a User has to sign in and the device will be assigned to this user. This is a use case for dedicated devices. But there is another option which is called „Self-Deploying“ and can be used for shared devices or kiosk systems that do not have an dedicated user assigned:

Continue with the selection on how the device should enter Azure AD. There is the native „Azure AD joined“ way which is the best practice and future-advised way that you should goal but if you have the need of also have your devices be joined to your On Prem AD you can select „Hybrid Azure AD joined“. Hybrid requires you to have an AAD Sync, Intune AD Connector and defined „Domain Join“ Profiles within the configuration profiles in Intune. I would recommend you to start with „Azure AD joined“ and only think about Hybrid when you see use cases where you cannot be without On Prem Integration.

The next two steps are about hiding License Terms and Privacy Settings. So that the user does not have to read and accept them. Privacy Settings can be pre-defined with Intune configuration profiles so you can hide them too.

Now there are 2 very important steps. You need to define if the user can select if he wants to be a normal or an admin user and how the default experience is. Think about when you enroll an windows device without management. There the user who is created in the Out-of-the-Box experience will become local administrator but you do not want office users to be administrators on their work devices. So you can select (only with Autopilot for Windows devices) that the first user will become a standard user and not an admin user. I would definitely recommend you to set this. If needed you can grant users admin rights later on with Intune.

The next step is about a very cool feature which lets you pre-provision devices. The default behavior of Autopilot is that a user runs the enrollment by himself but you have everything pre-defined so that he only needs to sign-in and wait for the process to finish until the device is ready. But in some cases you might want to pre-provision devices for non-technical users or when the user does not have a great Internet bandwidth. On those use cases you can enable pre-provisioning to pre-stage devices at your location and then hand them over to an user. The user will see the same experience but app and policy installations already run so the process will be faster and does not require much Internet bandwidth:

Configure a language and keyboard layout if needed, otherwise leave it on „Operating system default“:

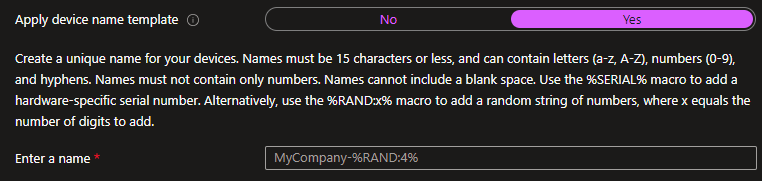
The last option is also very cool. You can define the hostname of the devices from Autopilot. Here you can set static names or use a Random or Serial number String. From my experience in most cases we used an location code as the prefix followed by the devices serial number. You can build that for example like that FRA-%SERIAL%. When we now have a device from Frankfurt with a serial number of 12345 the hostname will become FRA-12345.
-
Assign Profiles to Devices: Assign the Autopilot profiles to the devices in the Microsoft Endpoint Manager admin center. This association allows the devices to receive the appropriate configuration during the out-of-box experience (OOBE). I would recommend you to create an device group that automatically collects your devices. You can create a automatic collection group for ALL devices with an Hardware hash (Description HERE) or you can create a group for each location and use Group-Tags within Autopilot to create and use multiple configurations to apply to different devices.
-
Distribute Devices: Once configured and associated with Autopilot profiles, the devices can be shipped directly to end-users. When the devices are turned on for the first time, they will automatically enroll in Intune and be ready for use with the predefined settings and apps.
Benefits of Using Windows Autopilot
- Simplified Deployment: Autopilot eliminates the need for complex manual setups. End-users can easily unpack the device, power it on, and start using it immediately with pre-configured settings and apps.
- Zero-Touch Experience: IT administrators no longer need to touch each device individually, resulting in significant time and cost savings. This zero-touch approach enhances productivity and reduces deployment errors.
- Seamless Remote Provisioning: Autopilot is perfect for remote and distributed workforces. Employees working from home or different locations can receive pre-configured devices without IT physically handling them.
- Better End-User Experience: By providing a seamless and personalized setup experience, Autopilot enhances end-user satisfaction and productivity, leading to higher employee engagement.
Autopilot vs. Pre-Provisioning Mode
While both Autopilot and pre-provisioning mode are used for device deployment, they differ in significant ways:
- Automation Level: Autopilot offers a completely automated zero-touch deployment experience. In contrast, pre-provisioning mode involves some level of manual intervention to install the operating system image on the device before shipping it to the end-user.
- Device Ownership: Autopilot is ideal for organizations that retain ownership of their devices, allowing them to manage and reconfigure them over time. Pre-provisioning mode is typically suitable for organizations that want to transfer ownership to end-users immediately.
- Configuration Flexibility: Autopilot allows IT administrators to define granular configuration settings for each device based on user profiles, providing a more personalized setup. Pre-provisioning mode generally has a one-size-fits-all approach.
Conclusion
Windows Autopilot, when combined with Microsoft Intune, revolutionizes the device provisioning process, bringing a zero-touch experience to end-users. With its automation, simplicity, and remote deployment capabilities, Autopilot streamlines device onboarding, enhances end-user productivity, and reduces IT overhead. By leveraging this powerful technology, organizations can embrace a more efficient and seamless approach to managing their Windows devices.